Are you looking for a contractor?
Submit our quick form and get quotes now!
Table of Contents
5 min read
How To Clean Paver Stones Step-by-Step Instructions

5 min read
How To Clean Paver Stones Step-by-Step Instructions
Exterior renovationsHow To Clean Paver Stones Step-by-Step Instructions
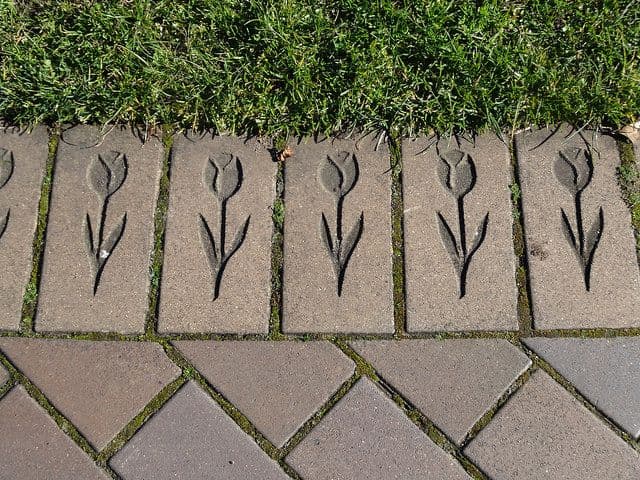
Concrete pavers lock together neatly in place, adding a beautifully decorative element to the landscaping or driveway of any home. Pavers are manufactured specifically to eliminate stormwater runoff in all climates, so not only do they look great, but they also serve a significant purpose.
Since they sit outside day and night, and deal with constant wear and tear of the changing weather, driving vehicles and stomping feet, they require a proper cleaning.
Even though they appear tough, paver stones are delicate things that must be washed correctly so that they maintain lustre and colour. If your driveway is embellished with paver stones, RenoQuotes.com is offering you ways to give them a solid clean and update!

Prepare the Paving Stones for Cleaning
Cleaning your pavers correctly will vary depending on the material of the stone, so make sure to test out a small area with the cleaning method you choose before going forward on the entire paved surface.
Before you begin cleaning, make sure to prepare the surrounding area by clearing off any furniture and plants that might be resting on the stones. Also, cover or remove all metal objects, as there is a chance they could be tarnished in the cleaning process.
Look for and brush away any moss and weeds that have accumulated between paver joints, as leaving weeds unattended will shift pavers apart over time. It is recommended that you periodically apply a granular weed preventative product between joints as part of your paver routine.
If you are finding that the growth cannot be removed by hand, use weed killer. Try to choose an environmentally-friendly brand and something that does not have harsh chemicals in case it damages the stones. Unfortunately, if you use any form of weed killer, it is important to wait weeks before moving forward with cleaning your pavers.
Following the removal of weeds in the area, hose down pavers to prepare them for cleaning. Be careful to clean them gently, as using any form of high water pressure will damage the pavers and cause them to deteriorate as well as exposing the aggregate on the pavers' surface.
However, the pavers need to be slightly wet before you can move on to the next steps.

Everything Prepped? Time to Clean Your Paver Stones!
As we stated earlier, depending on the material of the stone, the cleaning solution you choose may vary. However, there are a few tried and true DIY options that will work on most materials.
The simplest method is found in our home's kitchen. Make your way under the sink and grab that soap you use to wash dishes. Regular dish soap works as a degreasing detergent, and can easily remove most stains found on pavers.
Mix the soap in a very large bucket of water to make a cleaning solution that is made from just soap and water. Then grab a clean, stiff bristle brush to scrub the dirty pavers.
Work in small areas at a time, making sure to be extra precise, move the brush in small circular motions to remove the stains.
source: Flickr, denisbin
Products that can be used for paver stone maintenance
Another at home method for cleaning pavers is also found in your kitchen. Go to your cupboard and grab some white vinegar. This natural disinfectant does an excellent job cleaning and is also an environmentally friendly option that won't ruin the surrounding vegetation.
However, avoid dark vinegar, as you risk the possibility of further staining your pavers depending on how porous the material. Let the white vinegar and water solution soak on the stone for 1 hour, then gently scrub away the stains in the same manner that we suggested previously.
Whenever possible, try to avoid chemical treatments, as many of these are highly toxic and can be a risk to children, pets or surrounding vegetation. There are definitely environmentally-friendly options out there, so if you've got some tougher stains and want to invest in a paver cleaner, check your local hardware store for chemical free and eco-friendly choices.
Also, the harsher the chemicals, the more likely a chance that the colour of stones fade or materials disintegrates.
If you are finding there are tougher stains on pavers, such as tire marks from your car or excess oil, these can be cleaned off with a rubber remover or a granular oil absorbent, also found at your local hardware store. Make sure that if you are cleaning a spill, it should be soaked up and not rubbed, as rubbing will drive the stain deeper into the paver.

Your Pavers are all Clean, What's the Next Step?!
Following cleaning, hose the pavers thoroughly, as built-up film will need to be removed. Although it is not recommended, if you choose to clean your paving stones with a high-pressure hose or power washer, be careful not to remove the all-important joint sand, as this acts to maintain the longevity and placement of the stones.
If you are concerned that you lost a significant amount of sand in the cleaning process and feel it needs a touch-up, go ahead and replace the sand between the paving stones.
Sweep the sand over the paved surface with a dry/stiff bristled broom, pour sand and sweep over the pavers until the joints are filled. Following this, use a misting or very light hose setting to mist water over stones.
Remember to keep in mind that the joints between pavers are the most sensitive areas, so do not saturate pavers, as the sand-bedding will deteriorate and cause the stones to do the same.
It is also recommended that you use a sealer following cleansing, as this will make future cleaning ventures much easier. Further, it enhances the colour and helps to maintain the appearance of stones over a long period.
However, do not apply a sealer more than once in three years, as too many applications can create a film on the surface of the stones, and it may discolour in the sunlight.
Recap of how to clean paver stones
Choose the cleaning product(s) you will be using;
Assemble all the necessary equipment;
Remove any weeds that are in the way;
Prepare the surface;
Wait the appropriate time before the stones are ready to be cleaned;
Wet the surface;
Work on small areas at a time and move the brush in circular motions;
If necessary, let the cleaning solution rest on the surface for a certain amount of time;
If applicable, remove tougher stains using other appropriate techniques described in the article;
When using a power washer, be careful not to remove the joint sand.
Get 3 renovation quotes for your paver stone project
RenoQuotes.com can help you get quotes for your paver stone project. If you submit your project to us, we’ll put you in contact with 3 qualified professionals. Fill out the form on our homepage (it only takes a few minutes), and you will receive quotes from trusted renovation specialists.
Dial 1-844 828-1588 to speak with one of our customer service representatives.
Last modified 2023-12-11
Looking for something else?
Related articles
The latest industry news, interviews, technologies, and resources.
N/A • 07 Nov 2023
The garage is a multipurpose room that has the potential to serve several functions. With lots of homeowners using this space to hold items that aren't exactly necessary for everyday use, it's important to think about how storage can be created to maximize the potential of this room.
N/A • 07 Nov 2023
A demolition project isn’t just about destroying a home from the ground up. In fact, there is a lot of careful preparation and planning involved. Demolishing a home or part of a house takes time and effort, and workers performing demolitions are exposed to many potential hazards. Therefore, it is especially important for demolition contractors to take extra care when undergoing this type of project.

N/A • 07 Nov 2023
As August comes to an end, it’s time for us once again to get busy and dig through the internet in search of the best articles on interior design, decor and renovation written this past month!

Amanda Harvey • 20 Mar 2024
As the spring approaches, homeowners are beginning to consider inventive ways to update the outdoor features of their property. As the entrance to your home, the driveway is an important facet as the introduction of your humble abode: it sets the mood, welcomes guests and, following a long day at work, grants you access to all your favourite things.

Karine Dutemple • 07 Nov 2023
Do you intend to start a housing construction project shortly? As this project is certainly a large one, it is quite normal to have some concerns or questions about the current increase in the cost of building materials.