Are you looking for a contractor?
Submit our quick form and get quotes now!
Table of Contents
5 min read
How to Install a Drop Ceiling

5 min read
How to Install a Drop Ceiling
Interior renovationsHow to Install a Drop Ceiling
Although installing a drop ceiling is the perfect project for any and all DIY enthusiasts, it’s still important to know the proper installation guidelines to follow when proceeding with this project. So here's everything you need to know about installing a drop ceiling.
What You Need to Know About Installing a Drop Ceiling
Both inexpensive and relatively easy to install, drop (or suspended) ceilings allow for easy access to plumbing or pipes without causing damage to the ceiling surface. Also, note that due to the thickness of the ceiling tiles, they've soundproofing and heat insulating properties, which is also a valuable asset.
Two Main Types of Drop Ceiling Tiles
Expanded polystyrene tiles
The first option you have is expanded polystyrene tiles. This type of tile is super light and, as an added bonus, can be painted with acrylic paint, which will make your ceiling fit perfectly with the room’s chosen colour scheme.
Polyurethane tiles
As for polyurethane tiles, these have relatively similar properties to the previously mentioned tile, aside from the fact that its finish is proof of greater craftsmanship and the patterns embedded are more detailed. Therefore, it’s the ideal choice when wanting something with a little more aesthetic appeal. Moreover, these tiles are available with mouldings, which give off a certain allure once the ceiling installation is complete.
Importance of having a plan
To avoid a size discrepancy between the tiles lining the walls and the others, make sure you draw your plan according to the lines running down the centre of the ceiling as a starting point. By doing so, you’ll be able to create a ceiling with symmetrical lining tiles. Furthermore, you’ll be able to know the exact number of tiles necessary to complete the ceiling installation.
Cost of a Drop Ceiling
Your new drop ceiling is available for roughly $3.50 to $6 per square foot, excluding costs related to installation.
Steps to Installing a Drop Ceiling

The first step consists of installing the L-shaped mouldings all around the room, starting with the narrowest wall. Note that you should leave a 4-inch gap between the joists and the supporting ceiling tile grid. Should you want to install soundproofing insulation, leave a 5 to 6-inch gap instead. With a level, mark down the height around the room.
Next, place the steel angle bar under the line and secure it with nails while respecting the proper spacing, which should be 16 or 24 inches. Note that, normally, the main tracks should be inverted to the joists so that the weight of the ceiling is evenly distributed over the joists.
In order to adequately suspend the ceiling tracks, use suspended ceiling attachment spindles. Rest assured, these are sufficiently strong to support the tracks. Note that the wire in question will have to be hung on one-and-a-quarter-inch nails hammered into the side of the joists and then inserted into the track holes. Alter the length of the wire so that it’s level with the L-shaped mouldings.
To proceed matter of factly, install two main tracks and then the ones located perpendicularly to those. Repeat the process by fixing an additional main track as well as the crossed tracks that correspond to it, all the way until your new drop ceiling grid is in place.
On the subject, it’s always useful to know that the first track installed will need to split the room into two equal parts to ensure that the main tiles are centred compared to the whole ceiling. Once completed, you’ll be able to go ahead and install the tiles.
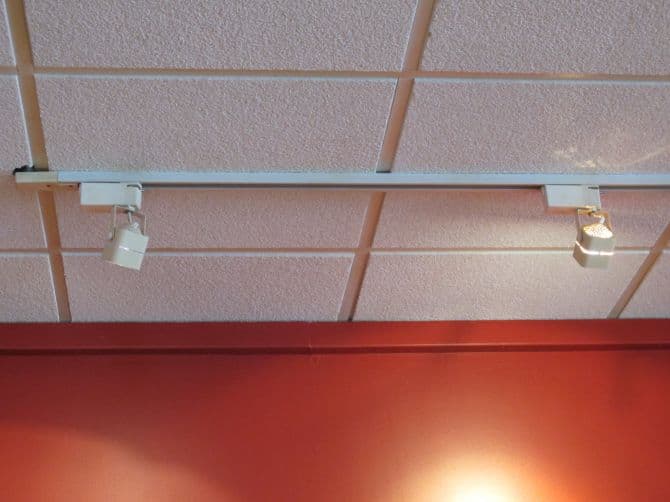
Installing Drop Ceiling Light Fixtures
Regarding a light fixture installation on a drop ceiling, make sure to choose tiles devoid of patterns so that one can work on an even, regular surface.
By preference, opt for light fixtures embedded with a suspension system to avoid resting the entire weight of the fixture on the tile, as this could damage the ceiling.
Few precautionary measures
To avoid staining your tiles, check that your hands are clean after having handled the tracks. Indeed, after handling these, your hands tend to be stained with a blackish substance, which risks smearing your tiles.
Should it be just a little too late to make use of this wise tip, it’s still possible to rectify the situation by trying out this little trick: Remove the first layer of paper from another tile and rub it against the stain, it should then quickly dissipate.
Since to err is only human and a tile might be rendered useless due to an inaccurate trim or cut, avoid being stuck and plan for at least three additional tiles when purchasing the lot. This precautionary measure will save you in case of unforeseen damage.
If you plan on installing your drop ceiling in the bathroom or the kitchen, the tiles will need to be treated against excess humidity beforehand to avoid premature wear.
Drop Ceiling Features | Key Facts |
1) Pros |
|
2) Types of tiles |
|
3) Plan |
|
4) Price |
|
5) Light fixture installation |
|
6) Few precautionary measures |
|
Get 3 quotes for your dropped ceiling installation
RenoQuotes.com can help you get quotes for your dropped ceiling installation project. By submitting your project, we’ll put you in contact with top-rated contractors. Fill in the form on the homepage (it only takes a few minutes), and you will get estimates from trusted professionals.
Dial 1-844 828-1588 to speak with one of our customer service representatives.
Last modified 2023-11-07
Looking for something else?
Related articles
The latest industry news, interviews, technologies, and resources.

Amanda Harvey • 07 Nov 2023
The kitchen is one of the most important rooms of the home, a place for the family to congregate after a long day of work and play, to cook a meal and to enjoy time together. There are plenty of moving parts that go into the construction and operation of your kitchen, and for things to run smoothly everything has to be laid out in a functional way. For this reason, it is important to update the surfaces, appliances and layout of your kitchen to suit the needs of yourself and your family.

Cynthia Pigeon • 07 Nov 2023
When strolling through Old Montréal or Old Québec, you have most likely laid eyes on this outward-opening, antique window model. Elegant with a vintage charm, a cremone bolt window (vintage or French casement window) is rarely your top-of-the-list choice when purchasing new windows. However, their beauty definitely rivals that of the other models available on the market.

Karine Dutemple • 07 Nov 2023
If you’re working as a contractor, it’s likely you’ll know the importance of nourishing and cherishing the relationships you build with your clients. A large factor in running a successful operation is getting off the ground and building a client base for your company.

RenoQuotes.com • 07 Nov 2023
Plastic is a hugely exploited building material since it’s durable, waterproof, supple, and lightweight. However, just like its many other daily uses, it definitely has a bad reputation. Subsequently, several companies are looking to take major steps to reduce its harmful effect on the environment.

Léa Plourde-Archer • 07 Nov 2023
Are you preoccupied with the current state of your floors? Do they need to be maintained or completely replaced? We have gathered several articles published on our home renovation blog in order to classify them under different categories. Therefore, you will be able to identify articles that interest you, so that you can find the information you are looking for: